Making your own Flaky All Butter Pie Crust doesn’t have to be a scary thing, in fact, with this Easy Pie Crust recipe you can make the best pie crust without all the worry! With this all-butter pie crust recipe you’ll get a flakey, great tasting beautiful crust every single time.
Flaky All-Butter Pie Crust
Pie crusts are the foundation of a delicious pie. Whether you're a seasoned baker or a beginner in the kitchen, making your own homemade pie crust can make all the difference in the final result of your pie. They are way better than store-bought pie crust.
I'll walk you through the steps to make a really good pie crust that gives you a crispy, flaky texture, and a tasty, buttery flavor. I'm also sharing some tips and substitutions along the way.
This buttery pie crust recipe is perfect to use for almost any pie. I really like to use this pie crust with lattice pies, double-crust pies, cut out pies, no-bake pies, and even some open faced pies.
Get ready to create the perfect pie crust that will take your pies to a whole new level of deliciousness!
In general, an all-butter pie crust is the most flavorful pie crust and provides a delicious base for your pies. This easy pie crust is a versatile crust, perfect for double-crust pies as well as single- crusted pies.
Different Pie Crusts and Top Crusts
- Designing your pie crust top is not only fun and pretty, but it’s important to do it properly depending on your pie goals.
- Open-Face Pie: This kind of pie can also be called a Tart depending on what kind of pie it is and where you’re located. It has a baked bottom pie crust but just has filling with no top crust. Pumpkin Pies and Pecan Pies are common types of Open-Faced Pies.
- Double Crust Pies: Have a bottom crust and a top crust. Typically these are solid tops that have 4 slits carved in the middle of the top. But you can also call a pie that has a solid bottom and a woven top, or a cut out top, a double crust pie.
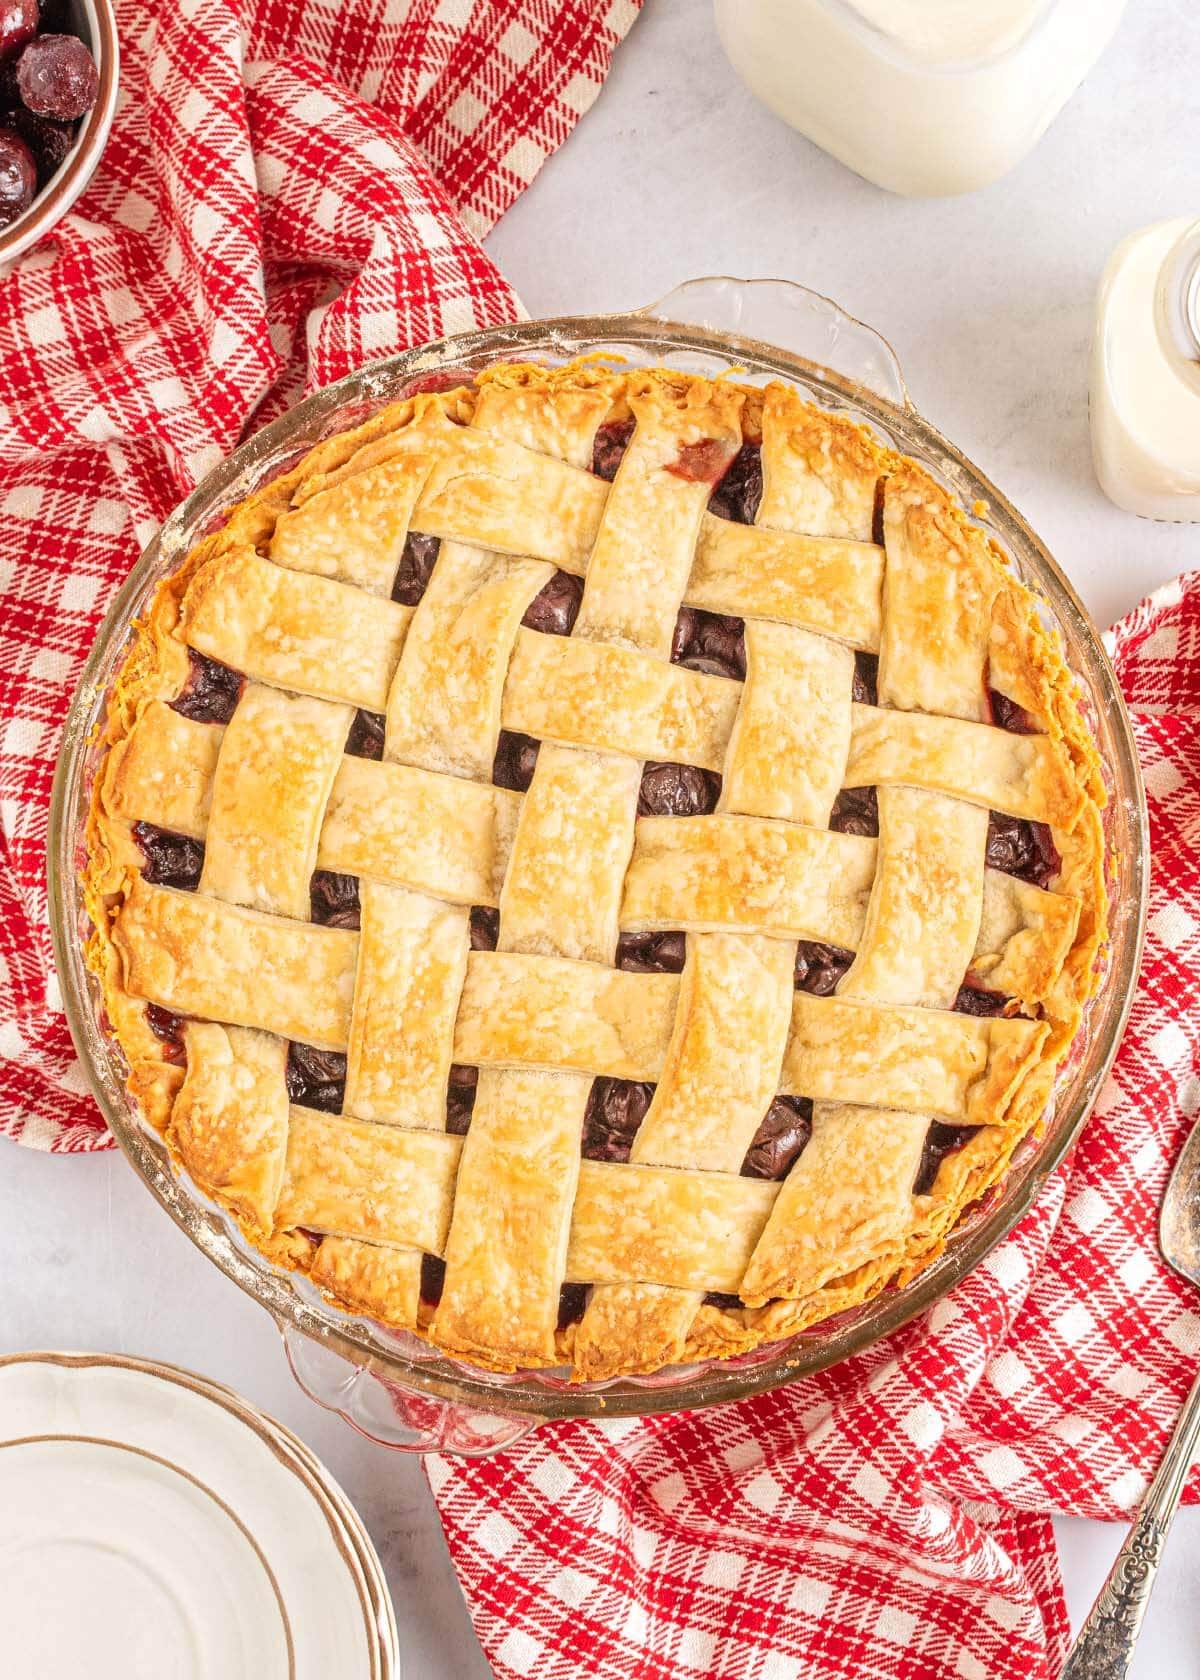
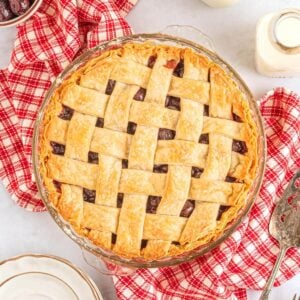
- Lattice Pies: Commonly you’ll see Apple Pies have lattice tops. It’s where pie crust dough is cut into strips and then weaved together in a woven basket pattern over top of the pie filling. The holes in between the lattice allows steam to release from the filling, as the pie bakes.
- Design Cut Out Pie Crusts: You can take the flat sheet like pie crust and cut shapes out of it. I like to cut designs out and craft them together, just make sure enough of the pie is covered and semi-connected. You can see one of my favorite cut out design pie crusts on my Blueberry Pie recipe.
- Deep Dish Pie: This kind of pie usually has no bottom crust, only a top crust. You can commonly find these on chicken pot pie, or deep dish quiches.
- Hand Pies: are like pastry pockets that are filled with tasty filling and then baked on a flat baking sheet.
- No Bake Pies: These don’t use a pie crust like we are making today, they’re typically made from crumb crust options. A fantastic no-bake pie to try is our Lemon Meringue Pie. It’s delicious and super easy.
Here are some common pie crust tops:
Choosing the Right Fat for Your Crust
This flakey pie crust calls is an all butter crust, but there are other fat options you can consider when making your pie crust. Butter will give you a tastier, flakier layered crust that holds up well and is sturdier than crust made with other fats.
Fat Options to Use
• Butter - Flavorful and tender pie crust. I use unsalted butter.
• Shortening - Great for a flaky, tender crust.
• Lard - A flakier crust, milder flavor, easy to work with at room temperature.
• You can also use a combination of any two of these fats like we use in the Easy Blueberry Pie recipe.
What is the Texture of this Pie Crust?
• An all-butter crust typically results in a rich and flavorful crust with a tender and flaky texture.
• The use of butter in the crust creates layers of fat that melt during baking, resulting in a light and delicate texture.
• Butter adds a nice buttery flavor that pairs well with a variety of fillings.
• The crust tends to be slightly crisp on the edges while remaining tender and melt-in-your-mouth in the center.
Once this all-butter pie crust is baked it is has a pretty golden brown color, is perfectly crispy and somewhat flaky, yet it still holds together just perfectly. It has a light buttery flavor that complements any filling wonderfully and really is the best homemade pie crust to use with your favorite pie fillings.
How to Make the Perfect Pie Crust
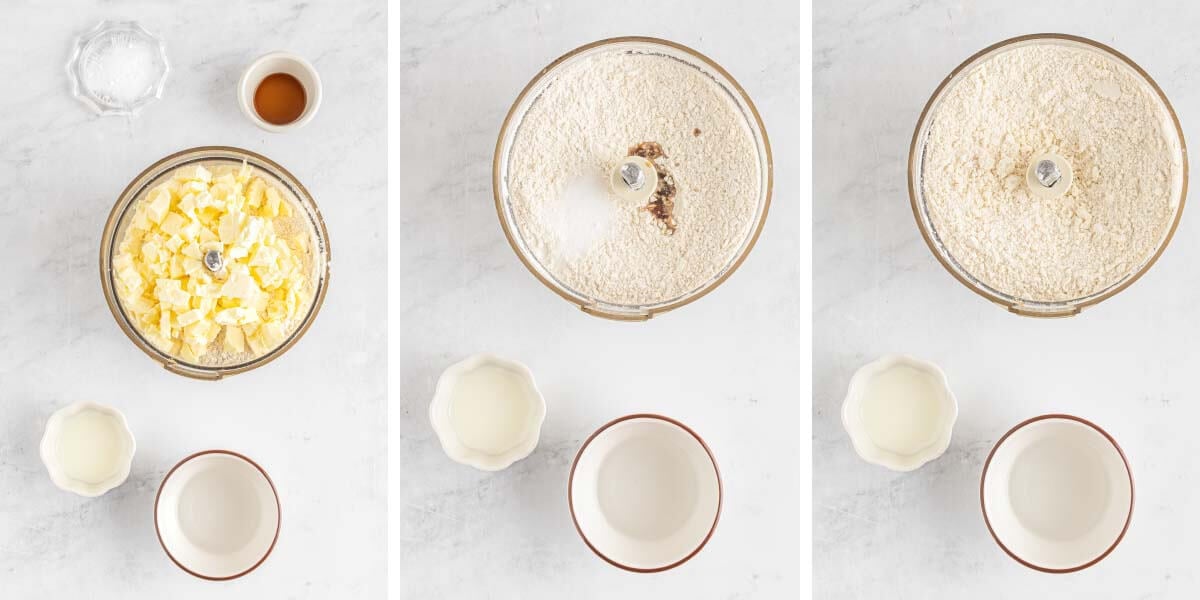
Start by adding the flour and cold cubed butter to a food processor. Pulse until the cold butter is evenly distributed and the mixture becomes crumbly and is the size of peas. You could also use a pastry cutter for this step.
Add the salt and vanilla to the food processor and pulse for about 5 seconds until combined. While the processor is running, slowly stream in the milk.
Continue running the processor and add the ice water gradually until the dough comes together into a ball. Be mindful not to add more water than necessary, as it can make the dough too sticky.
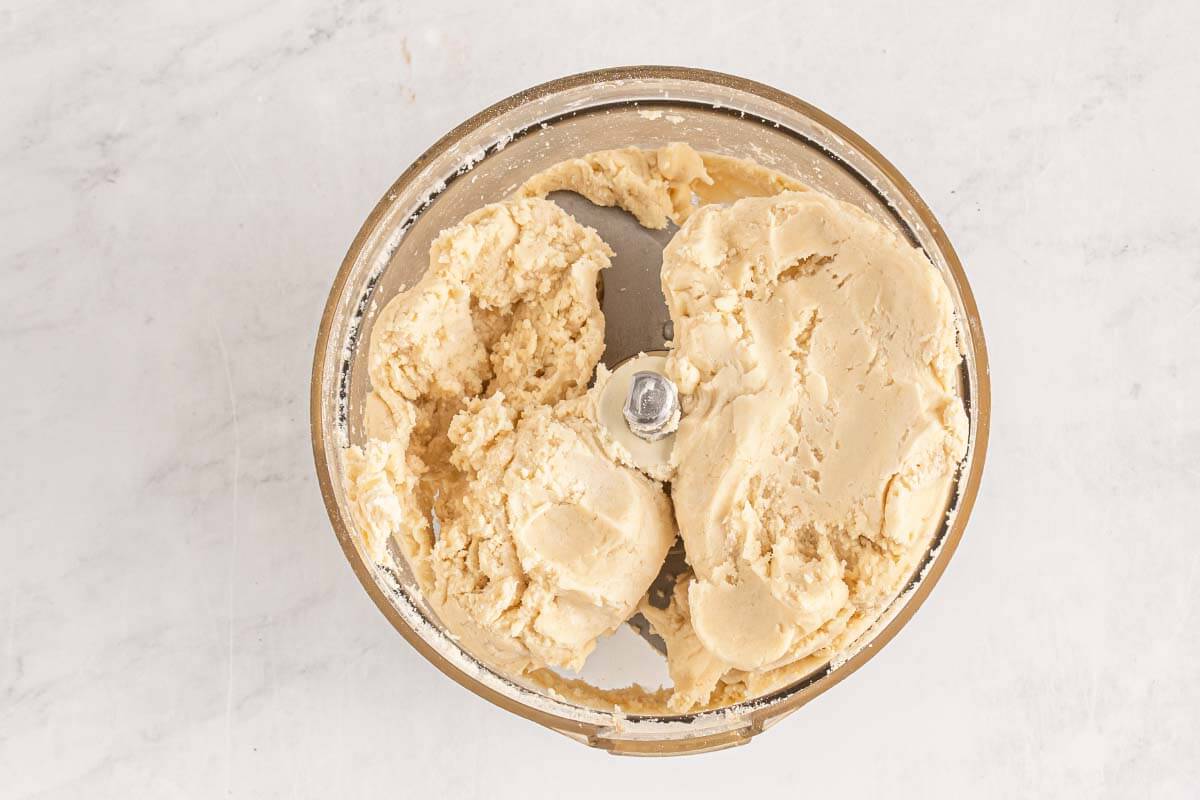
Once the dough has come together, remove it from the food processor.
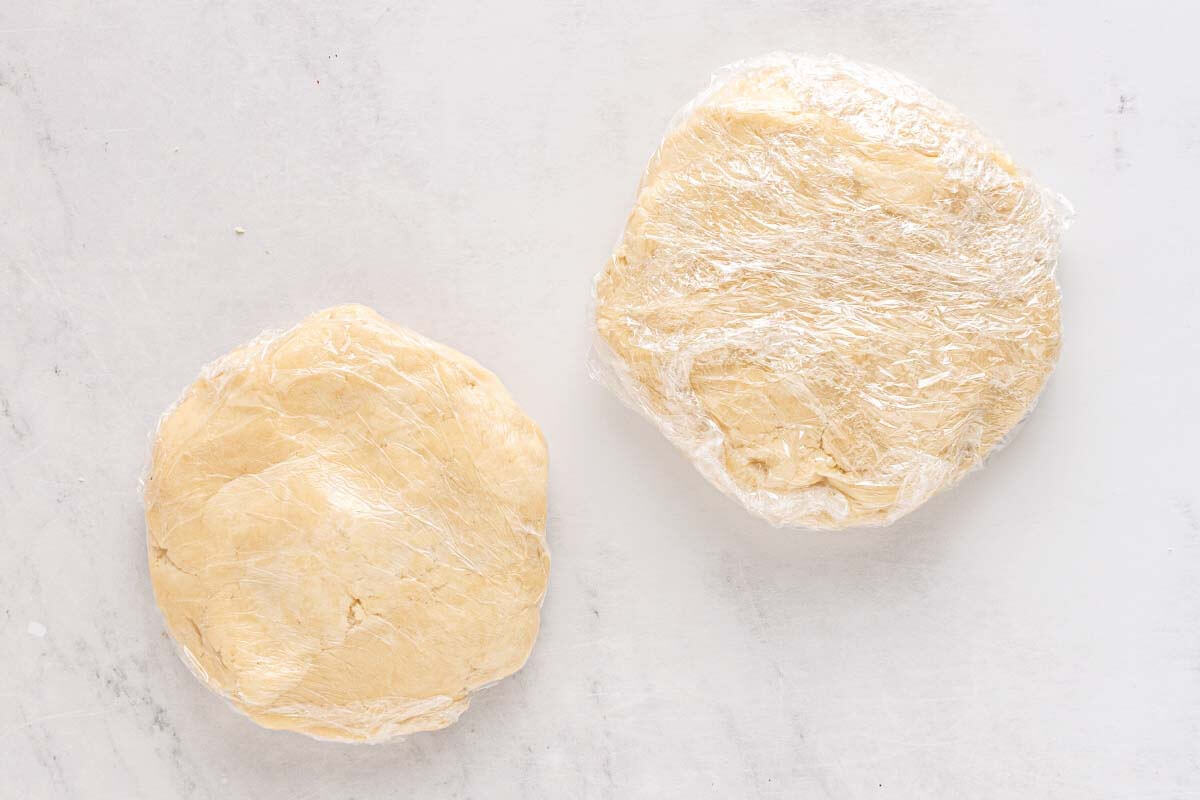
Divide the dough into two equal portions. Roll each portion into a ball, then flatten it into a disc about ¾ inch thick. Wrap the discs of dough tightly in a couple layers of plastic wrap and place them in the refrigerator to chill for 1 hour.
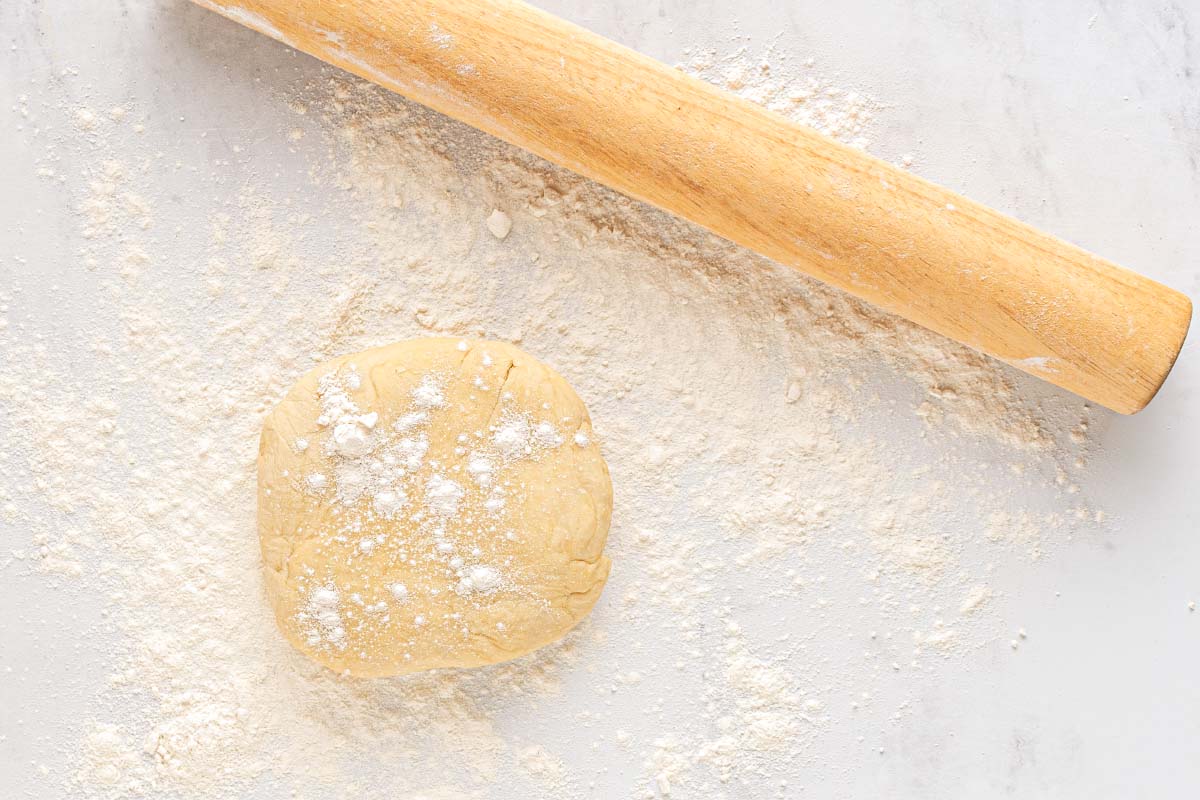
Remove one disc pie dough from the refrigerator after chilling.
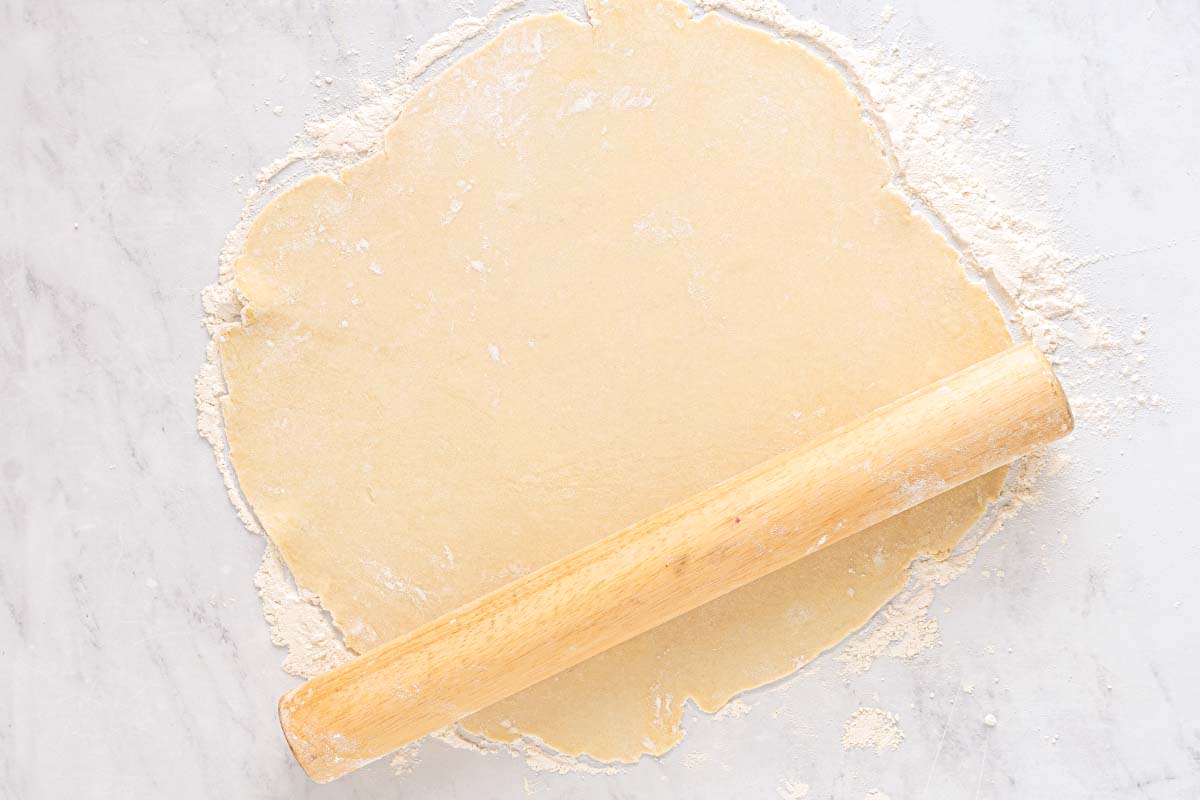
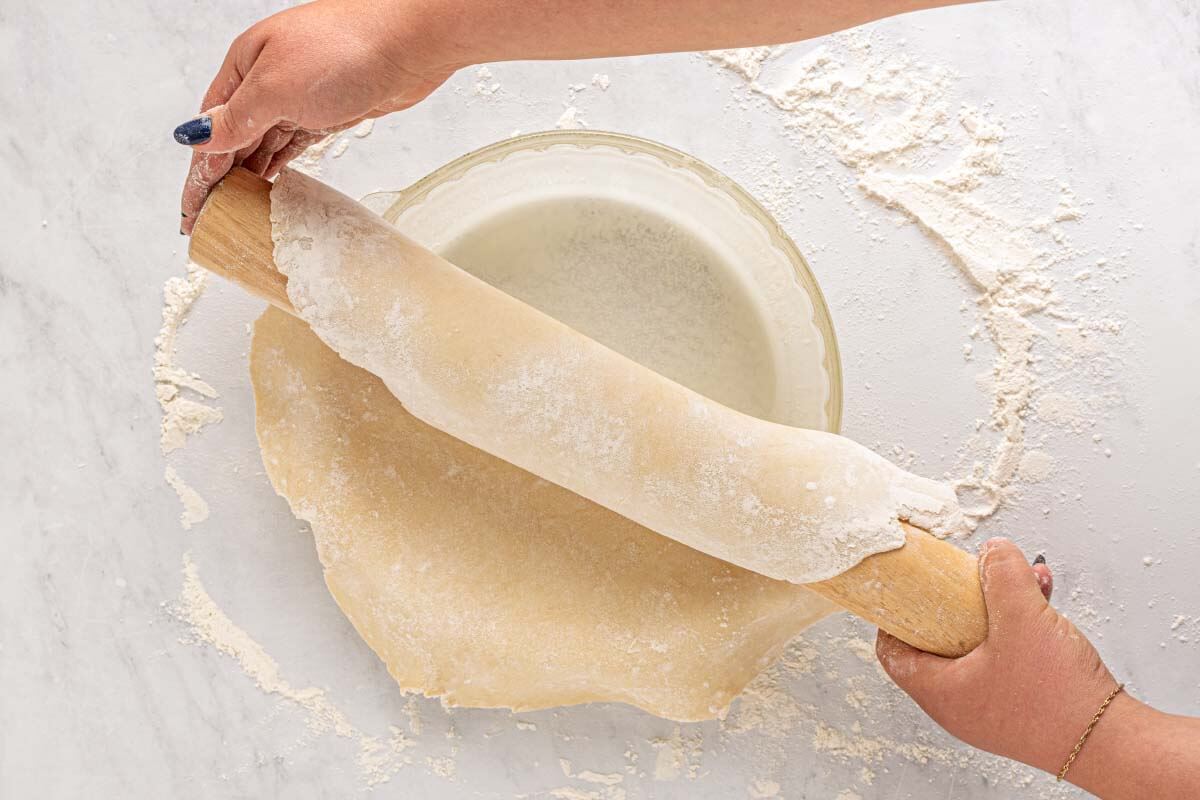
Place it on a lightly floured surface and use a rolling pin to roll dough out into a roughly 12-inch circle. Don't worry if the edges aren't perfect or if it's not a perfect circle.

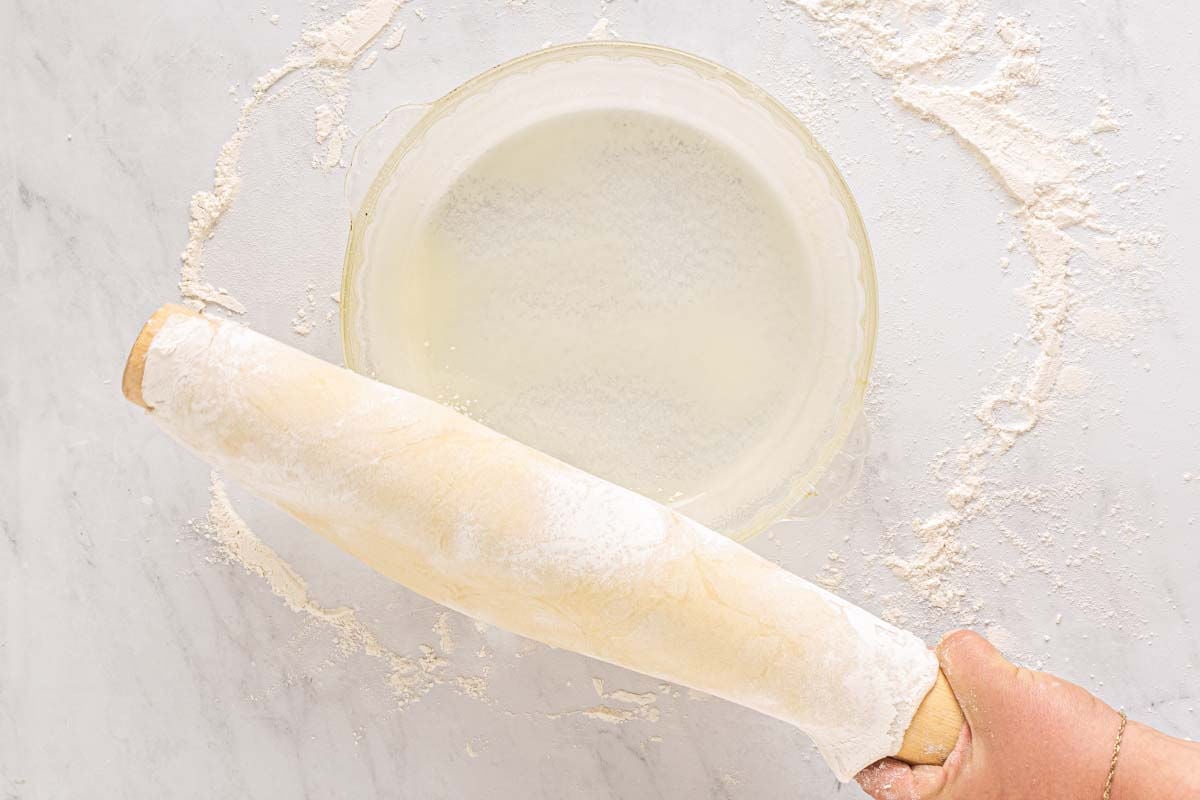
Carefully transfer the rolled-out crust onto a 9-inch pie pan.
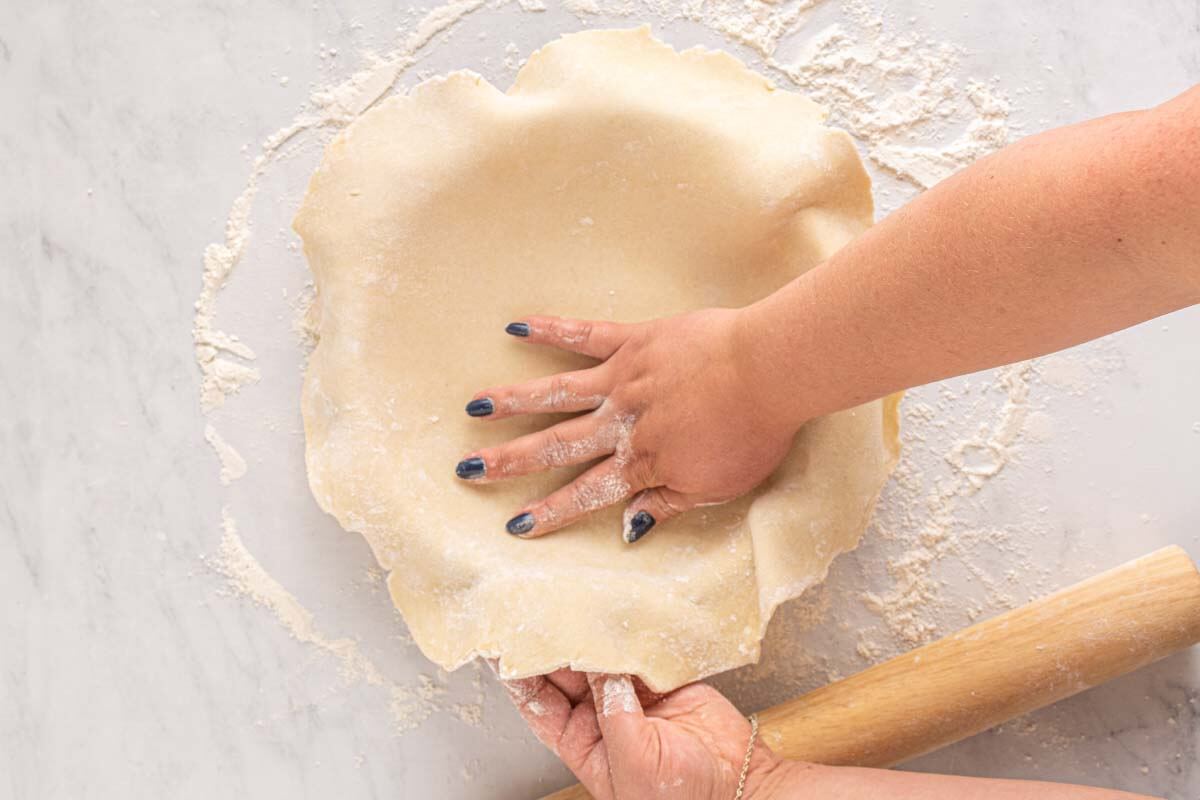
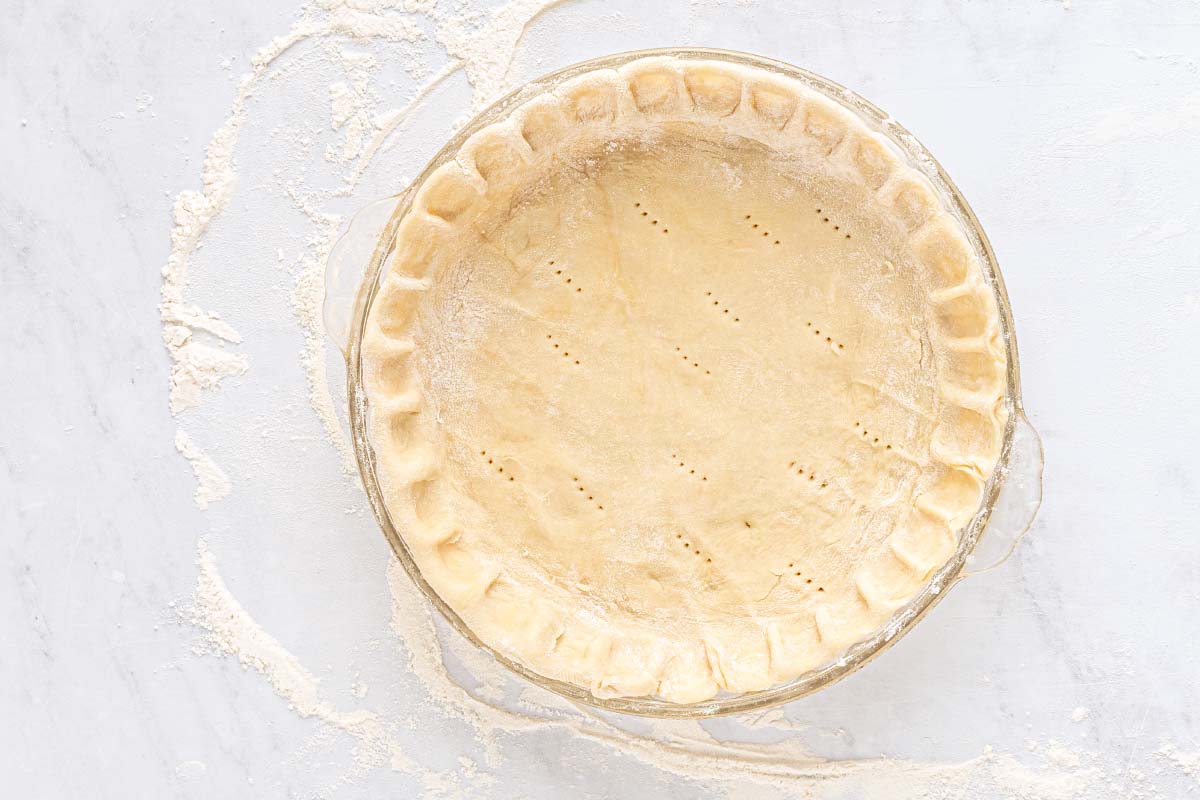
Gently press the crust down into the pan to remove any air pockets underneath.
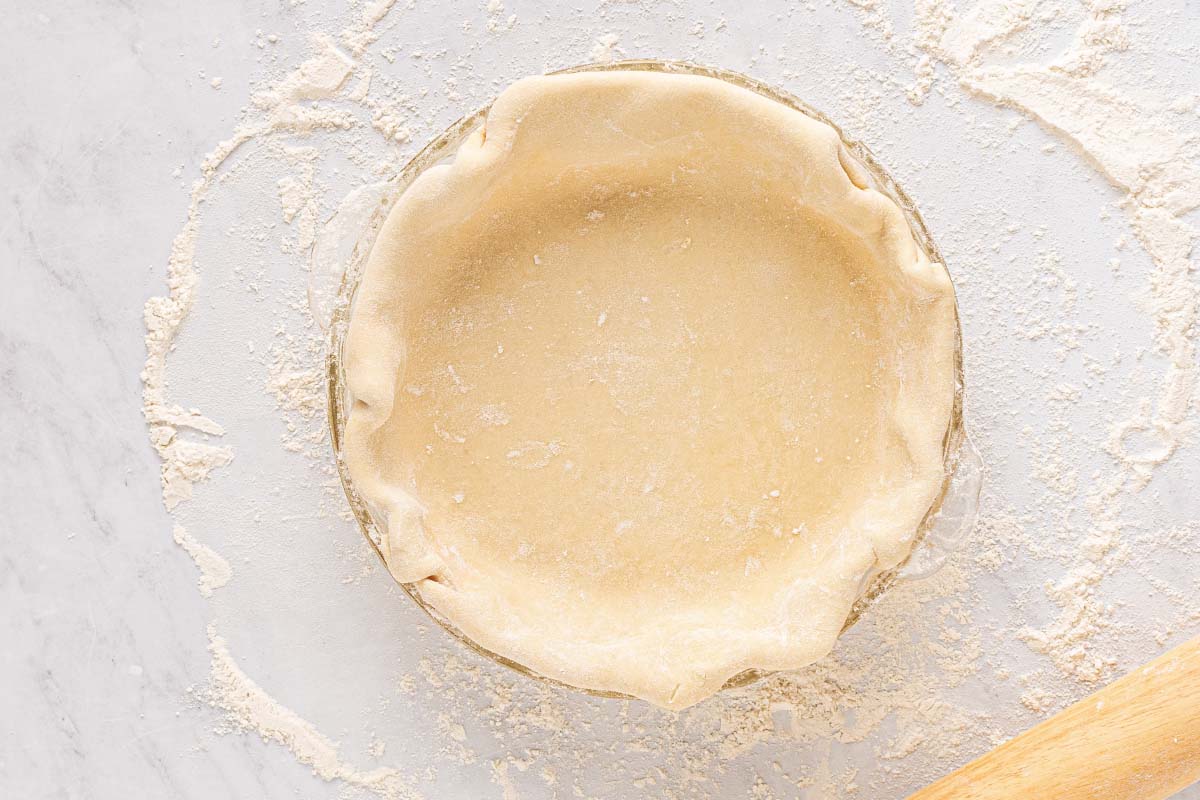
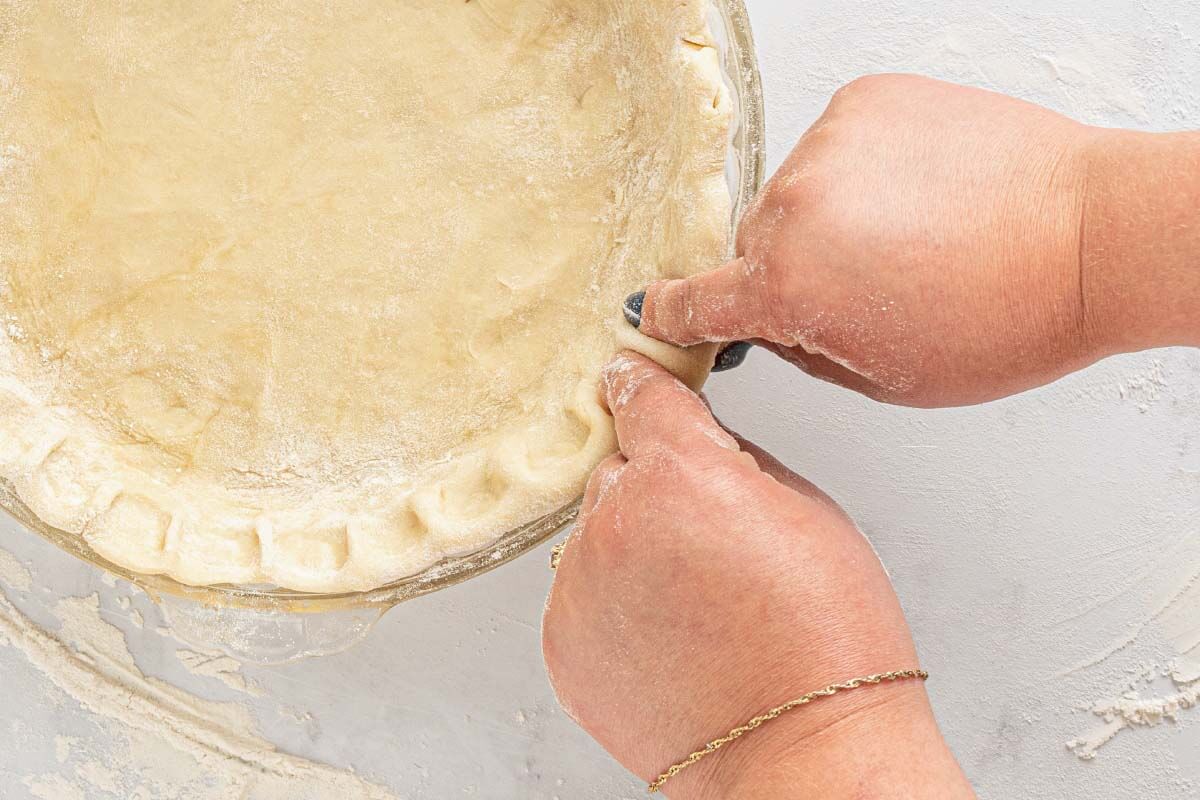
Fold the overhanging crust around the edges underneath itself to form a thicker border.
How Do You Seal the Top and Bottom Crust Together?
• When making a double-crust pie it is important to seal your edges together in some fashion. I suggest that you moisten the edge of the bottom crust with water or some other baking liquid before placing the top crust on top of the pie.
• When you go to crimp the edges of the pie crust this will help create a good seal between the two.
• For top and/or bottom crusts, using your index fingers, press the pie crust together to form ridges along the edge of the pan.
Should You Poke Holes in the Bottom of Pie Crust?
Poking holes in the bottom of the pie crust is called docking a pie. Usually, this is done by using a fork or a docking tool to poke several holes.
These holes are helpful so steam can escape while the crust bakes flat, without rising as it bakes. It’s a common thing to do when you’re blind baking a pie crust and also helps it bake evenly since the dough won’t be expanding and puffing up.
When the crust finishes baking, the holes will close up and the dough will reconnect, baking nicely and you won’t even know it was docked when it’s finished.
Dock the base of the crust with a fork to allow air to escape while baking. Line the crust with a piece of parchment paper large enough to cover the bottom and fold up over the edges. Place pie weights or dry beans on top of the parchment to prevent the crust from bubbling up during baking.
Heat the oven to 400°F (200°C). Bake the crust in the preheated oven for 24 minutes. If you're using this all butter crust for a pie that requires additional bake time, remove it from the oven after 24 minutes and let it cool on a cooling rack.
If you're making a no-bake pie, remove the pie weights and parchment paper and continue baking the crust for an additional 6-10 minutes until it turns golden brown. Remember to rotate the pan halfway through the baking process to ensure even browning.
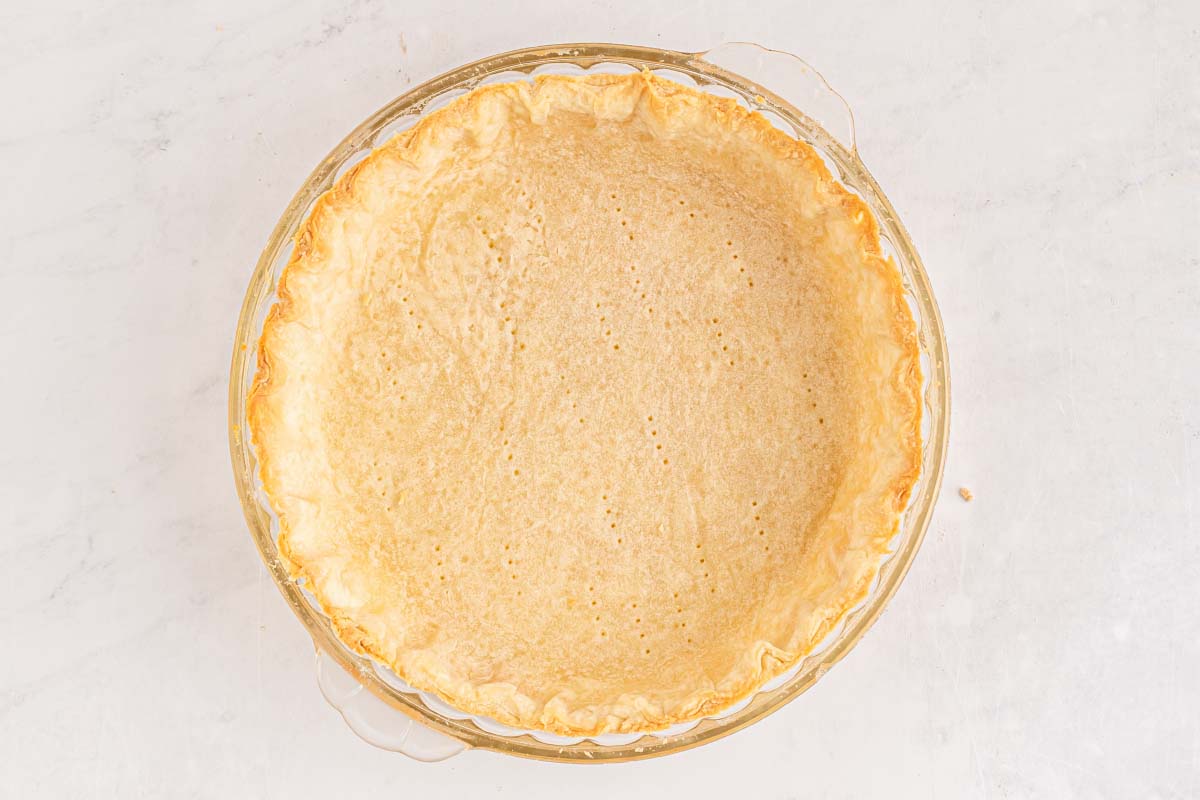
Once the crust is sufficiently browned, remove it from the oven and let it cool completely on a cooling rack before filling it with your desired pie filling.
Overall Tips for the Best Flaky Pie Crust
• The butter should be nice and cold and then make sure you cut it into small pieces to help ensure you get a nice flaky crust.
• It’s okay if your dough looks a little rough as you’re working with it, it’ll work out in the end. Just don’t add too much water to try to fix it. It’s important that you use a minimal amount of water for a nice flaky crust.
• Be careful not to overwork your dough or you’ll end up with a crust that’s hard and doesn’t flake nicely.
• If you’re out of milk or can’t use milk for your crust, you can use ice cold water instead.
Why Chill the Dough Before Rolling and Once You’ve Put it into the Pie Plate?
• Letting your dough rest and chill before rolling it out helps relax the gluten in the dough so it doesn’t become a tough pie crust.
• Chilling the dough is quite important. Chilling the pie crust dough hardens the fat in the dough, which then helps the crust hold its structure once you’ve formed it into the pie plate.
HELP! My dough keeps sticking when I roll it out!
- If you’re struggling with a sticky pie crust dough, no worries, there are a few steps you can take to address the issue:
- Each time you go to roll the dough using your rolling pin, pick up and turn the dough before rolling it out again. It can seem tedious, but it’s the key to being in tune with your dough as you’re working with it and being aware of when it may be close to sticking.
- If you feel like it’s starting to stick, as you go to pick it up, toss some flour underneath of it and try to roll it out a bit again, and work that flour into the dough so it will release from the work surface.
- Flour the work surface: Lightly dust the surface where you'll be rolling out the dough with flour. This will help prevent sticking and make it easier to handle the dough.
- Flour the rolling pin: Sprinkle a little flour on the rolling pin to prevent it from sticking to the dough.
- Chill the dough: If the dough becomes too soft and sticky while rolling, you can place it back in the refrigerator for a short period, about 10-15 minutes, to firm it up. This will make it easier to work with and prevent excessive sticking.
- Add more flour sparingly: If the dough is still sticky after chilling, you can sprinkle a small amount of flour over the dough. Be cautious not to add too much flour, as it can make the crust dry and tough. Incorporate the flour gently by folding and lightly kneading the dough until it becomes more manageable.
- Remember, it's important not to overwork the dough, as this can lead to a tough crust. Use minimal handling and gentle motions to roll out the dough. By incorporating these steps, you can achieve a smoother rolling process and prevent excessive sticking of the pie crust dough.
Can You Use Whole Wheat Flour?
- There are a few things to know if you’re wanting to use whole wheat flour to make your all-butter pie crust instead of regular wheat flour or pastry flour.
- If you want to use whole wheat flour, you can substitute it for the all-purpose flour in equal amounts or use a combination of both flours.
- Using whole wheat flour in place of regular wheat flour will not only change the color, but it will also change the texture and taste of your pie crust. The protein content in various types of flour can also vary.
- Keep in mind that the texture and taste of the crust will be different, and it may require a bit more liquid to achieve the right dough consistency.
What is Blind Baking and Why Do It?
• Blind baking is a technique used in baking to prebake a pie crust before adding the filling.
• The purpose of blind baking is to ensure that the crust is fully cooked and crisp, especially when the filling requires less baking time or doesn't require baking at all.
• It is commonly used for custard-based pies, cream pies, or fillings that need little to no baking.
• It’s important to blind bake your crust any time you plan to make a pie with a filling that doesn’t need to be cooked. Whenever you make a pudding pie or certain types of fruit pie, you will need to blind bake your crust.
Is Par Baking the Same as Blind Baking?
• No it is not. Blind baking fully cooks the crust so you can add no-bake fillings to it. For cold pies, usually.
• Par baking, on the other hand, involves partially baking a crust that will later be baked again with a filling in it.
• Par baking is often done when the filling requires partial baking but does not need as much time as the crust does to cook fully.
What Are Pie Weights and What Are They Used for?
When you go to blind bake your crust, I suggest you line the crust with parchment paper and use pie weights before baking the shell.
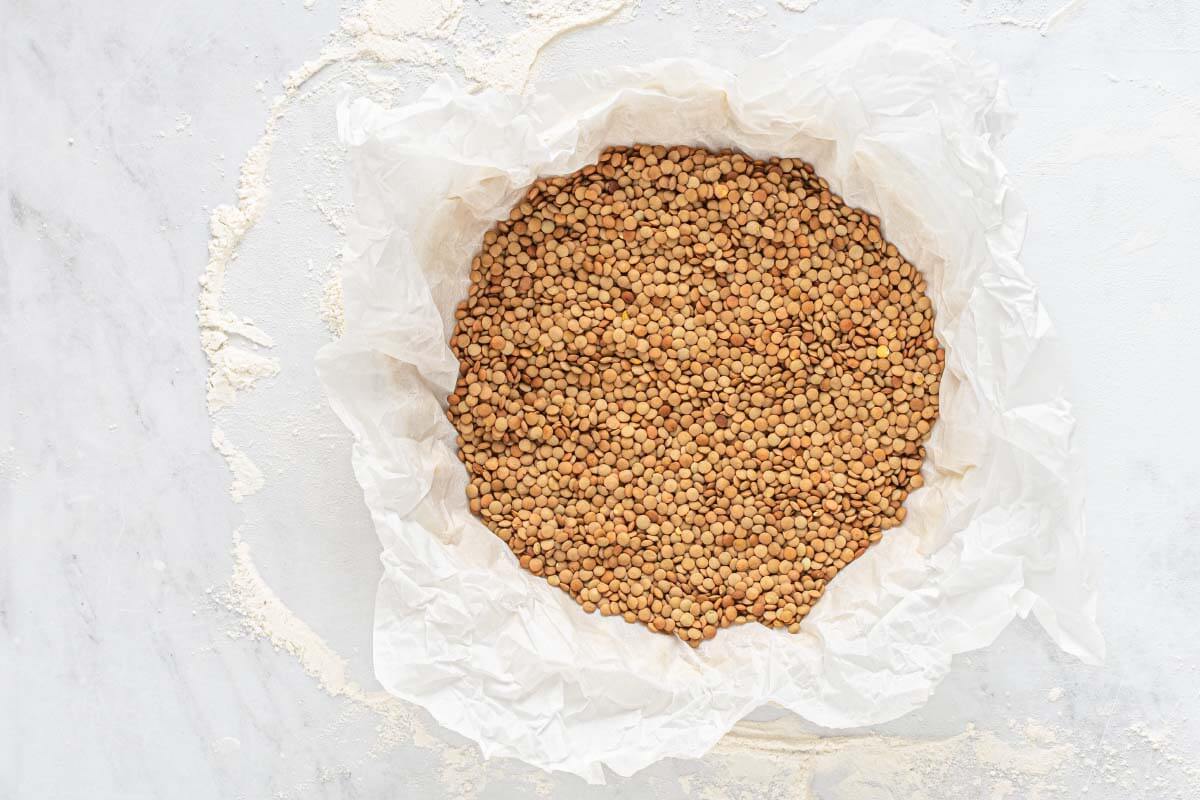
Pie weights are small ceramic or metal balls that are used when baking the pie crust bottom shell. Having weight on the crust prevents it from puffing and rising up as it bakes.
Once you bake the crust, remove the pie weights and continue assembling and baking the pie.
If you don’t have pie weights, there are a few other things you can use instead. Here are some ideas:
• Dry uncooked beans
• Rice
• Marbles
Not only do weights keep the crust from puffing up, they helps ensure that the pie crust bakes evenly all the way through and helps prevent the bottom of the crust from getting soggy.
Generally, a 9-inch pie will need about 2 pounds of pie weights. If you’re making a different sized pie, you will need to adjust your pie weight needs.
How Do You Make the Top of a Pie Crust Shiny?
If you want a shiny pie crust top here is what I suggest you do, beat an egg yolk and a tablespoon of water together before brushing the mixture on top of the pie crust prior to baking.
If you're looking for just a slight shine but nothing that's full and glossy and golden crust, brush the pie crust with half & half cream before baking.
And, for just the slightest eye-catching shine, sprinkle some sugar crystals on the pie crust before baking.
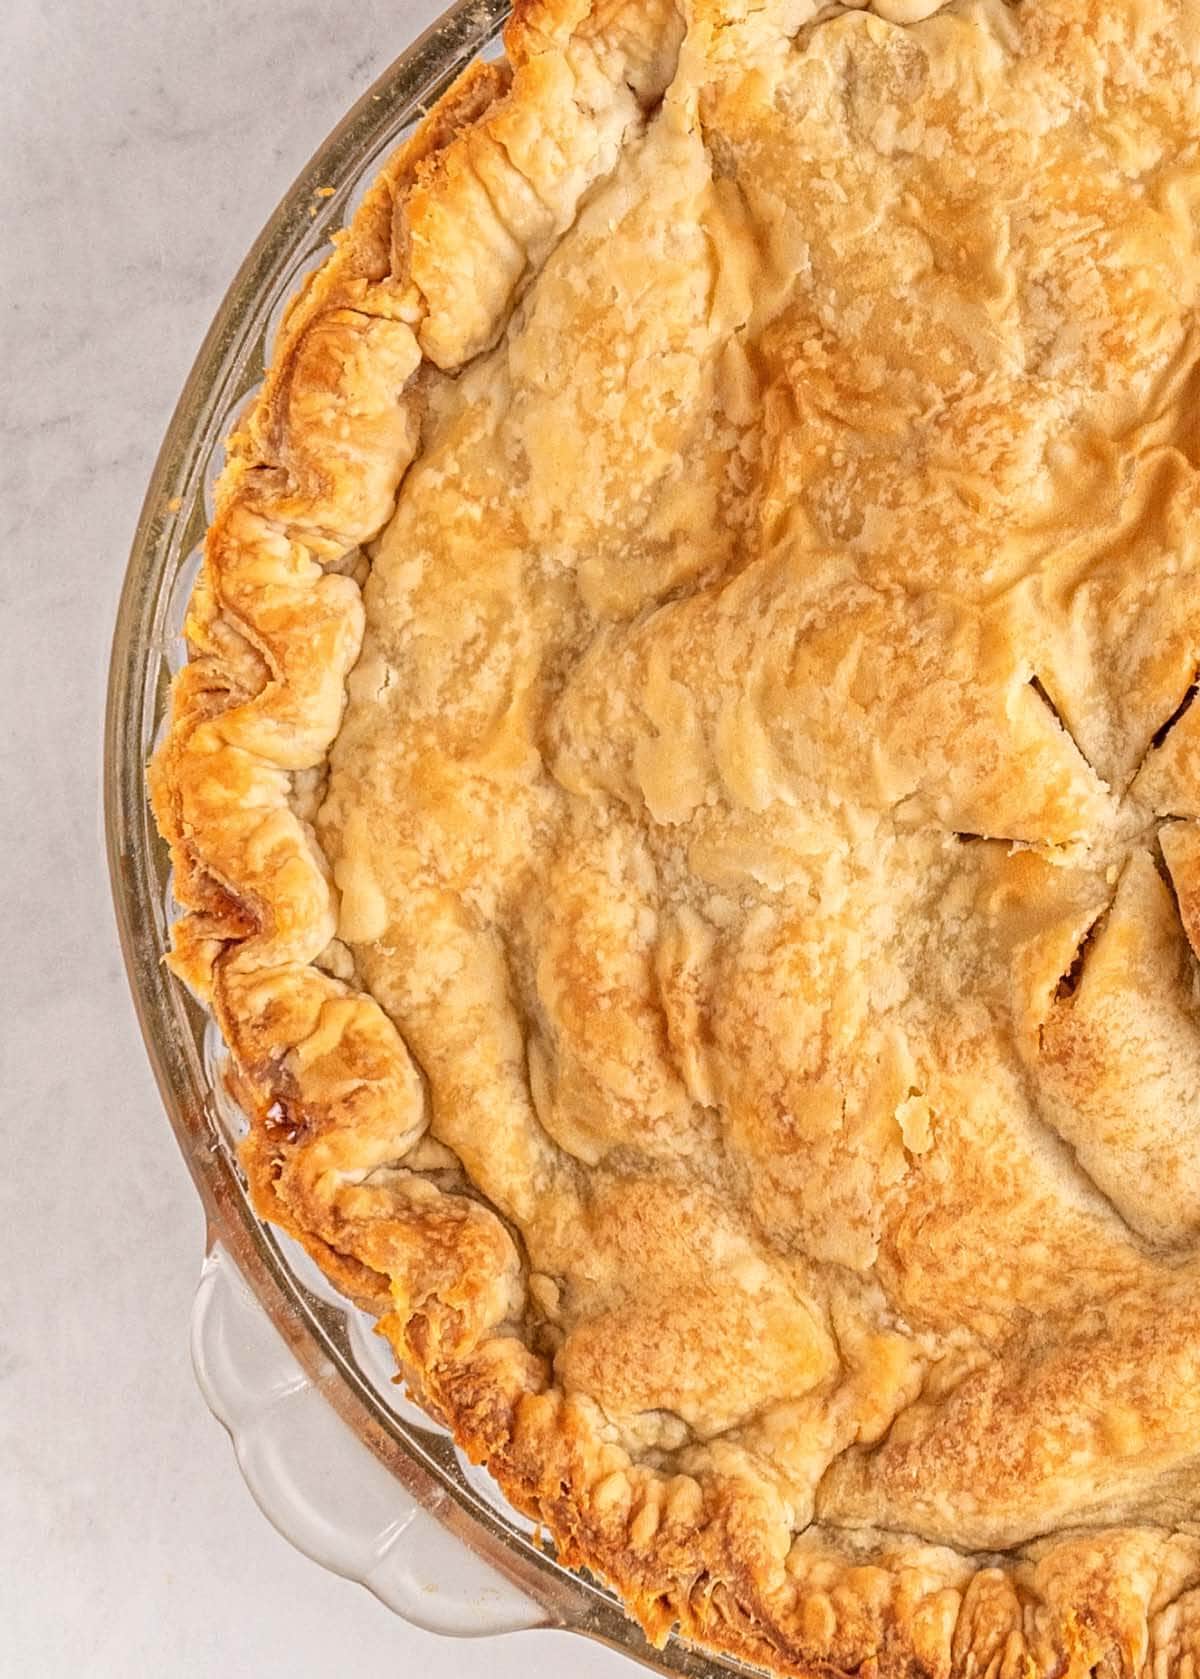
Why Cut Slits into the Pie Crust Top?
If you are baking a full pie crust top, it is important to cut 4 slits in the middle so the steam has somewhere to vent while the pie filling and top crust are baking.
Can You Make a Pie Crust Ahead of Time?
- Yes you can! Simply make and bake your pie crust and keep it in the refrigerator until you’re ready to use it in a few hours.
- Alternatively, if you wish to keep it longer, you can bake your pie crust and store it covered on the kitchen counter at room temperature for up to three days in advance.
- If you want to make the dough ahead of time, you can make the dough, cover it and place it in the fridge for up to a week in advance.
Some of my Favorite Pie Recipes to Make with this All-Butter Pie Crust
Cherry Pie
Apple Pie
Blueberry Pie
Pumpkin Pie
Pecan Pie
Bacon Cheese Quiche

All-Butter Pie Crust
Equipment
- Food Processor or Pastry Blender
- 9-inch Pie Dish
- Rolling Pin
- Plastic Wrap
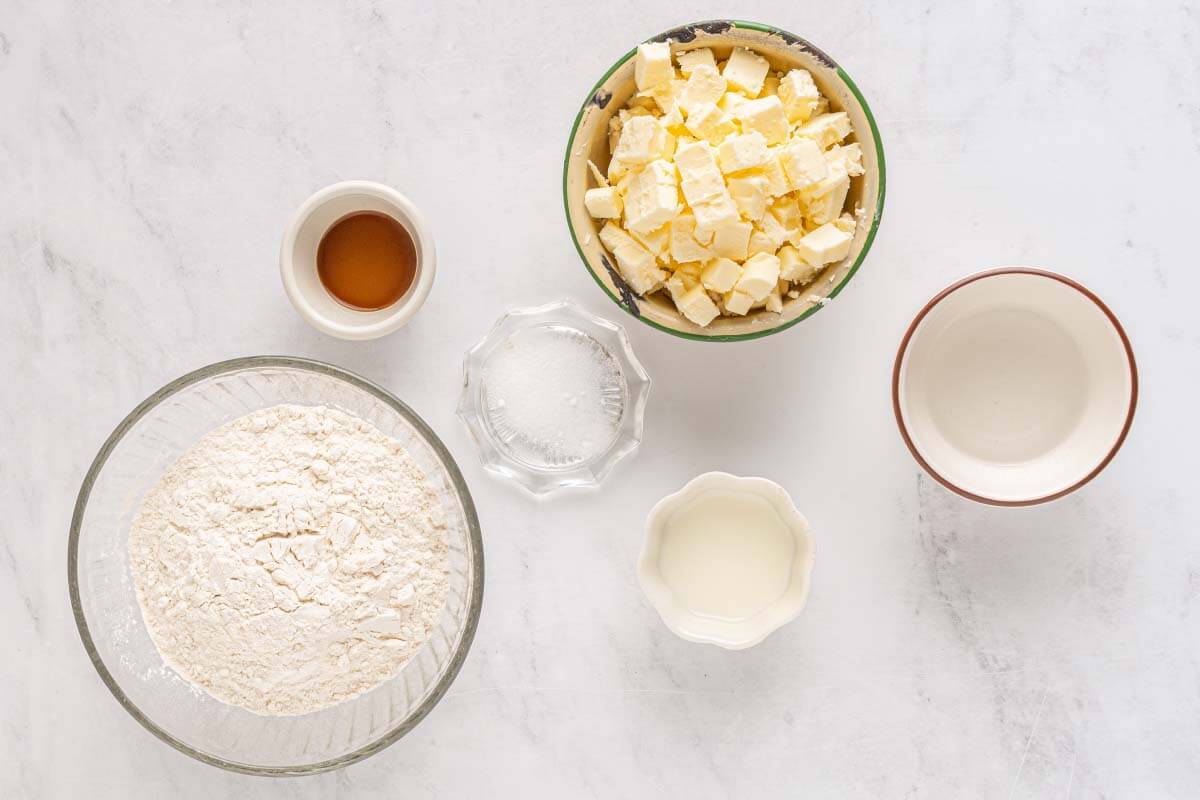
Ingredients
- 2 ½ cups Flour
- 18 Tablespoons Cold Butter cubed
- 1 teaspoon Salt
- ½ teaspoon Vanilla
- 4 Tablespoons Ice Water
- 2 Tablespoons Milk
Instructions
- Start by adding the flour and butter to a food processor. Pulse until the butter has been cut into the flour and the mixture is crumbly.
- Next, add the salt and vanilla and pulse until combined, about 5 seconds. With the processor running, stream the milk in through the feed chute and let it combine.
- Slowly stream the water in, stopping when the crust has come together into a ball. If it is too dry, continue adding the remaining water. Do not add any additional water as it will become too sticky.
- Once the crust has come together, remove from the processor. Divide into two equal pieces. Roll each section into a ball then slightly flatten into a disc about ¾” thick. Roll each disc in plastic wrap and place into the fridge to chill for 1 hour.
- For a single-crust pie, begin by unwrapping one disc of dough after chilling. Place it onto a lightly floured surface. Use a rolling pin and roll it out into a roughly 12” circle. It’s okay if the edges aren’t perfect and if it isn’t a perfect circle.
- Once rolled, pick one edge of the crust up and carefully drape it over the rolling pin. Loosely roll the crust around the rolling pin, then unroll it over a 9-inch pie pan. Gently press the crust down into the pan to remove any excess air from underneath it.
- Fold the overhanging crust around the edges underneath itself to form a thicker border. Using your index fingers, gently press the pie crust together to form a ridge between your fingers. To create the next ridge, move your fingers over placing one into an already formed divet then press the crust with your other index finger together to create another ridge. Continue doing so until the whole top edge is pressed together into ridges. Use a sharp knife to cut off any excess crust from the top of the pan.
- Repeat with second disc of dough if making a top crust. Seal them together after filling the pie. See the blog post for more details.
Blind Baking
- To make the bottom crust for a no-bake pie or a pie without a top crust, you will need to blind bake it. Roll out one disc of dough, following above steps, and continue.
- Preheat the oven to 400°F. Use a fork to poke a few holes into the base of the crust to allow air and steam to escape.
- Place a piece of parchment paper down into the crust. The parchment needs to be large enough to line the bottom of the crust and fold up out over the top edge of the pan. Place a layer of pie weights or dry beans into the pan on top of the parchment.
- Place the pan into the preheated oven to bake for 24 minutes. If you are using this crust for a pie that needs additional bake time, remove from the oven after the 24 minutes of baking and let cool on a cooling rack.
- If you are making a no-bake pie filling, do not let the crust cool down. Instead, after having baked for 24 minutes, remove the pie weights and parchment and continue baking to let it brown up for about 6-10 minutes. Rotate the pan around halfway through to allow the crust to brown evenly.
- Once sufficiently browned and golden, remove from the oven and let cool on a cooling rack.
Notes
- This crust can be made ahead of time and refrigerated until ready to use.
- Pie weights are necessary for blind baking as they keep the crust from bubbling
up which also allows the entire crust to keep its shape.
Storage
Unbaked pie crust may be stored in the fridge for up to 1 week. Baked crust may be stored, covered, at room temperature for up to 3 days.Nutrition
More Details on Rolling Out the Pie Dough
- When rolling out the all-butter pie crust from a disc, follow these steps for a successful and even crust:
- Start with a chilled dough disc: After preparing the pie crust dough and shaping it into a disc, refrigerate it for at least 30 minutes. Chilling the dough helps firm it up, making it easier to roll out and prevents it from becoming too soft and sticky.
- Prepare a clean, floured surface: Lightly flour your countertop or work surface where you'll be rolling out the dough. This prevents the dough from sticking and makes it easier to handle.
- Flatten the disc: Take the chilled dough disc out of the refrigerator and place it on the floured surface. Using a rolling pin, gently press down on the dough to flatten it slightly.
- Roll from the center: Start rolling the dough from the center outward. Apply light and even pressure, rolling in one direction, away from you. Rotate the dough a quarter turn after each roll to maintain an even thickness and prevent sticking.
- Use gentle and even pressure: Avoid pressing too hard while rolling, as it can cause the dough to tear or become uneven. Instead, apply gentle and consistent pressure, gradually working the dough into the desired size and thickness.
- Aim for a uniform thickness: Roll the dough into a circle that's slightly larger than the diameter of your pie dish. Keep an eye on the thickness, ensuring it remains consistent throughout. If needed, lift and rotate the dough to achieve an even thickness.
- Lift and dust with flour: Periodically lift the dough from the surface to ensure it's not sticking. Sprinkle a bit of flour underneath if necessary, preventing it from adhering to the countertop.
- Check for desired thickness: Once you've reached the desired thickness, usually around 1/8 to 1/4 inch (3-6 mm), check the size by holding your pie dish over the rolled dough. Ensure there's enough excess dough to fit the dish with a slight overhang.
- Transfer the crust: Gently fold the rolled dough in half to lift it without tearing. Transfer it to a 9-inch pie plate, carefully aligning the center fold with the center of the dish. Unfold the dough and gently press it against the bottom and sides, ensuring it fits snugly.
- Trim and finish the edges: Trim any excess dough hanging over the edges of the pie dish, leaving a slight overhang. Fold the excess dough under itself, creating a raised edge, and crimp or decorate the crust as desired.


Laurie Baker says
I found this perfect all-butter pie crust tutorial, and it's so easy to make.
Jen says
My first pie crust ever! It came out flaky and good. Amazing instructions were very helpful. Thank you!