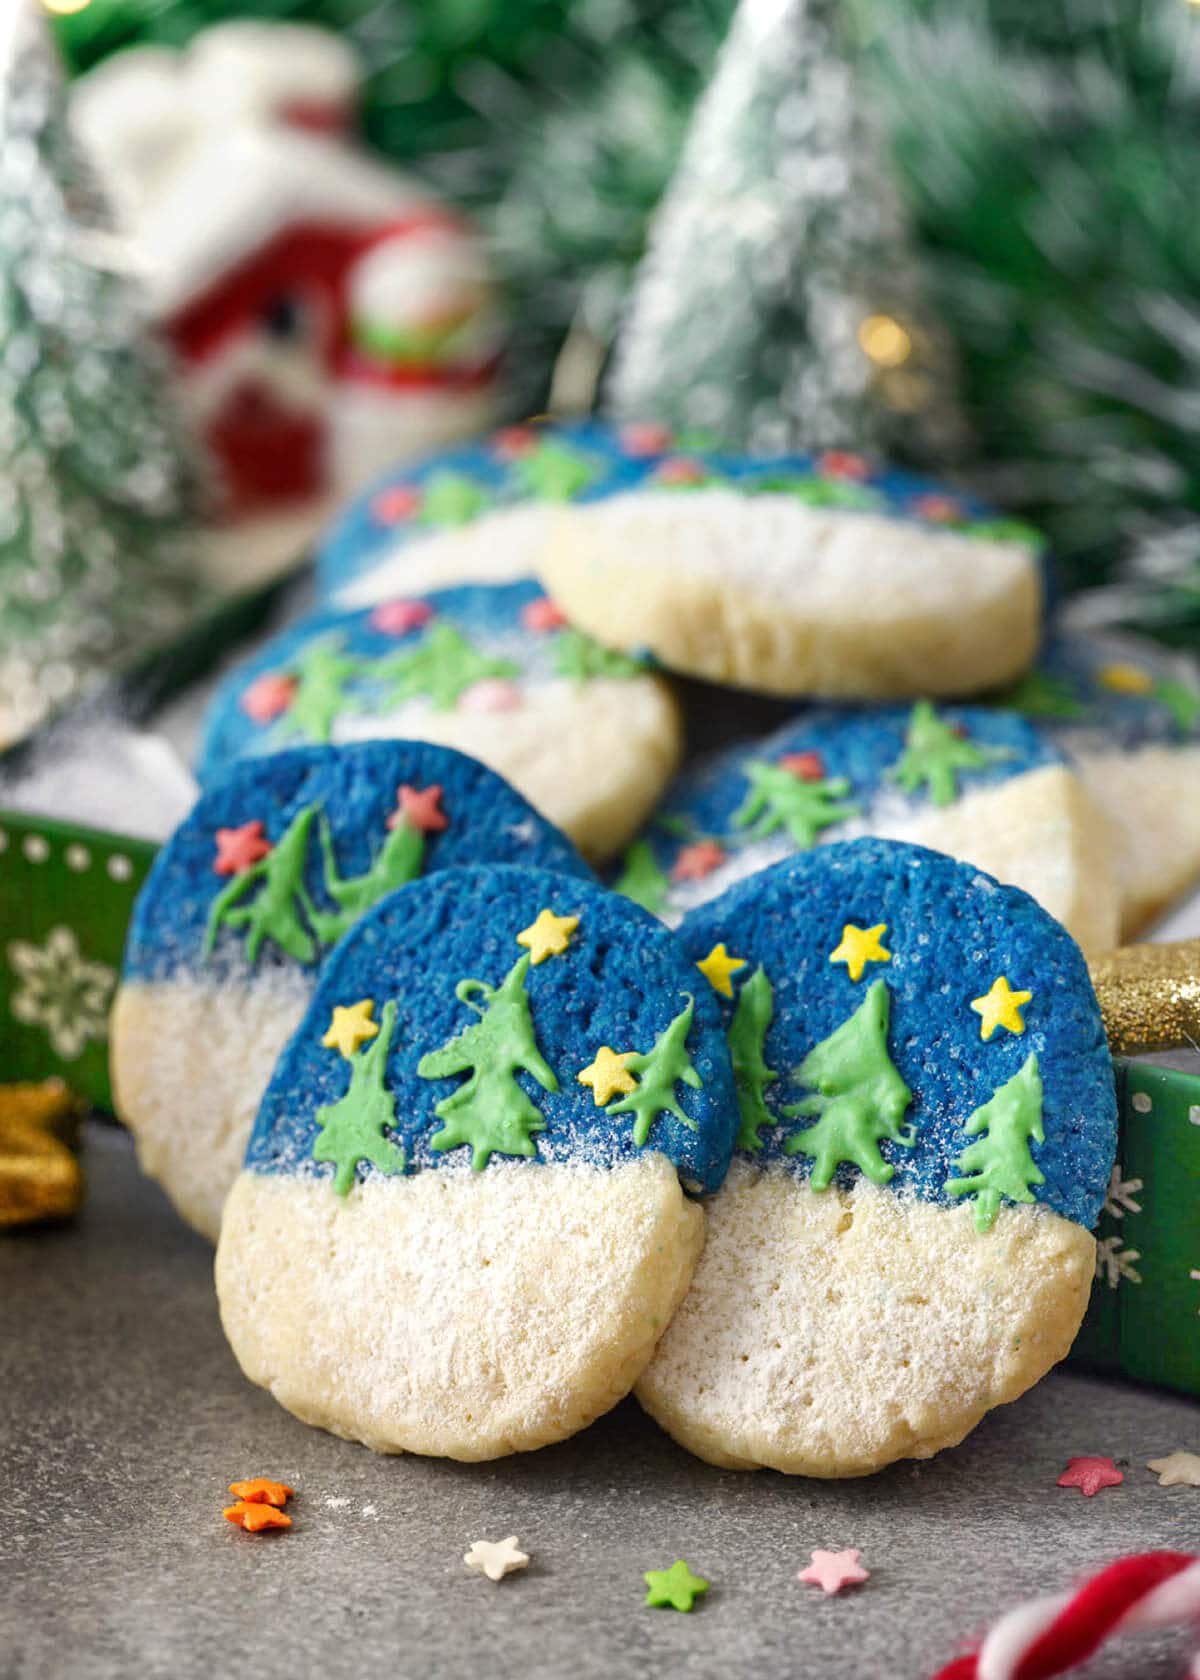
Winter Scene Christmas Cookies are charming Holiday cookies that have a pretty scene of trees and snow, with a blue sky on them. They are so easy to make, but they look like professional bakery cookies. This is a tasty, easy Christmas cookie recipe.
Winter Scene Christmas Cookies
Baking Christmas cookies is a tradition for many people. There are so many wonderful cookie recipes available.
Sometimes I want to make a cookie that is beautiful, and not the typical Christmas theme. That's where these Winter scene cookies are perfect!
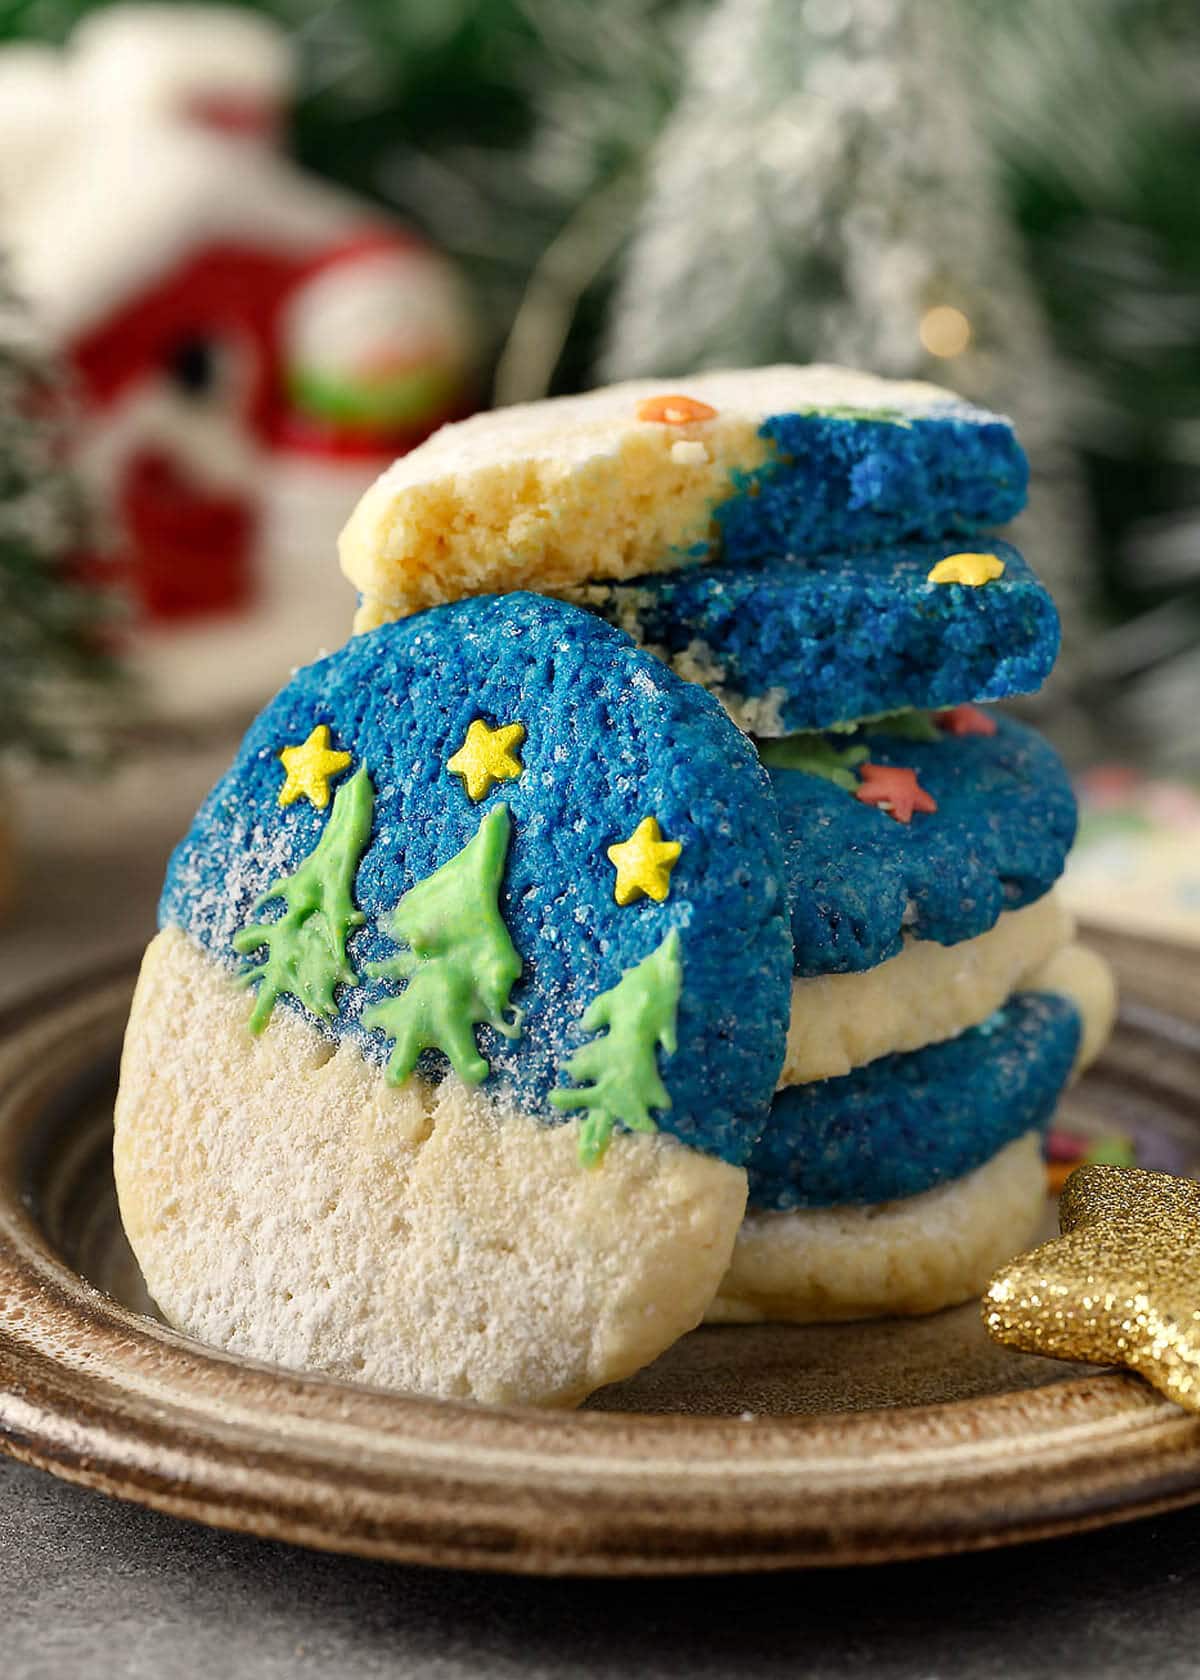
The design on these blue and white cookies says Winter, with snow, trees, and stars in a deep blue sky. This is a great cookie to give to people who may not celebrate Christmas (great for Hanukkah!).

After the cookies come out of the oven, let them cool on the pan a while. Add the stars while the cookies are still warm, but not too hot.
Then sprinkle some powdered sugar onto the white half of the cookies to make it look like snow on the ground.
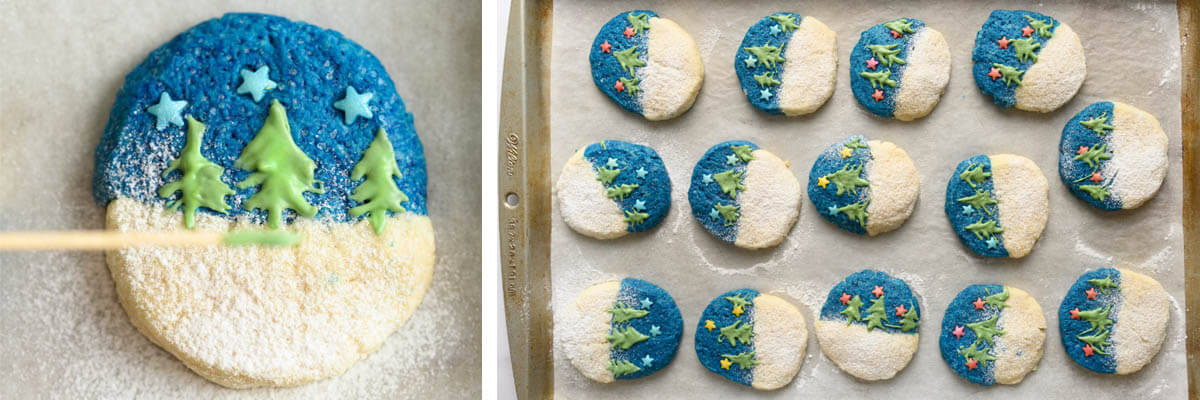
To make the trees, pipe on a littl;e frosting in the general form of a tree. Then use a toothpick to drag out the limbs of the frosting to your liking. They do not have to look perfect!
These Winter scene Holiday Cookies are perfect for gift giving. They will look so charming on your Holiday table, too!
Making the cookies with two colors of dough, you will get a rich color without using frosting. I think this method is so much easier and faster than frosting a batch of cookies.
These cute Holiday cookies are really easy to make, and they are yummy, too!
You Might Also Like
Candy Cane Cookies
Raisin Spice Bars
Chocolate Chip Cookies
Peanut Butter Cookies
Easy Coconut Macaroons

If you make this pretty Winter Scene Holiday Cookies recipe, please let me know.
Just leave a comment below with a star rating. I'd love to know how yours turned out!


Winter Scene Christmas Cookies
Equipment
- Baking Sheet
- Parchment Paper
- 1-2 Toothpicks
Ingredients
- ⅓ cup Granulated Sugar
- ½ cup Butter, softened
- 1 ¼ cups All-Purpose Flour, sifted
- ½ teaspoon Salt
- 1 teaspoon Baking Powder
- 3 Tablespoons Milk
- 1 teaspoon Vanilla Extract
- ¼ teaspoon Wilton Royal Blue Food Coloring Gel
Green Frosting for the Trees*
- 2 oz White Chocolate Melts or Chocolate Chips
- ⅛ teaspoon Green Oil-Based Food Coloring (*Or buy prepackaged tubes of green frosting if you prefer)
- Confectioner's Sugar for Dusting, as needed
- Wilton Star Sprinkles
Instructions
Make the Dough
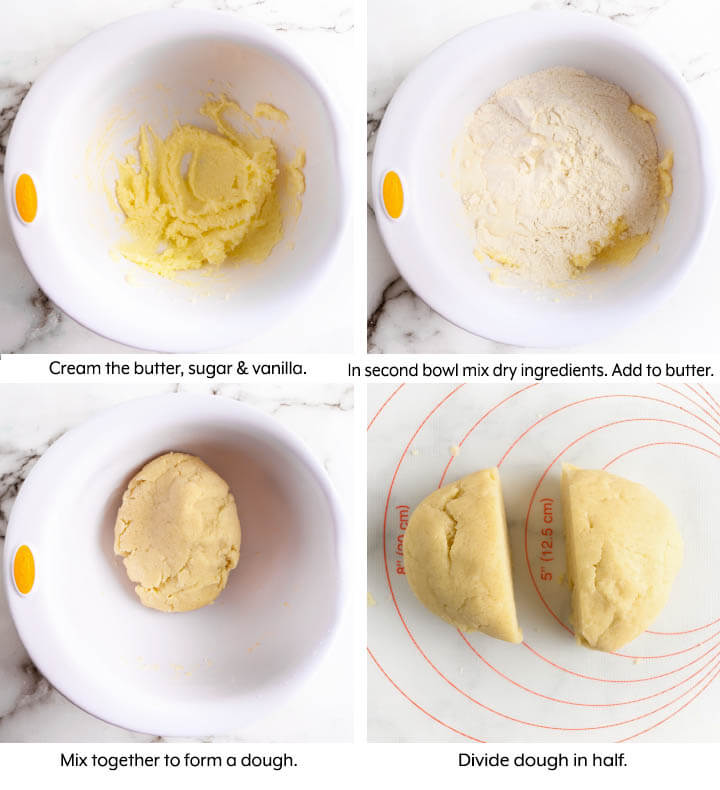
- In a large bowl whisk the sugar, vanilla and butter until light and creamy.
- Whisk together the flour, baking powder and salt in a separate bowl.
- Add the flour mixture to the butter and stir until the mixture comes together in a soft dough, gradually adding milk. Transfer the dough onto a working surface.
- Divide the dough in half. Using the blue food coloring, tint half blue.
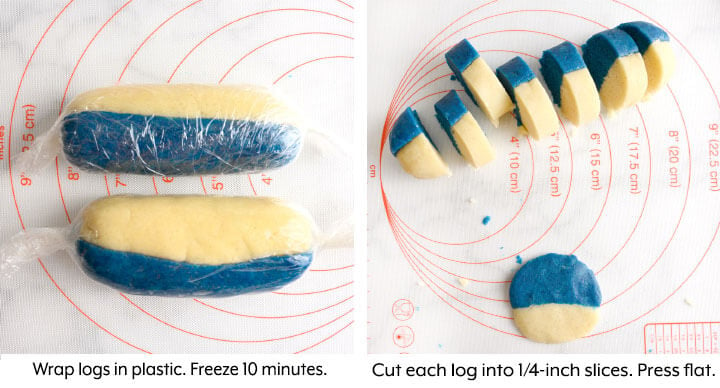
- Shape each piece into an even 8-inch log, then cut each log in half lengthwise and press white and blue halves together. Wrap each log with plastic and freeze for 10 minutes or until SLIGHTLY firm.
- Preheat your oven to 350° F. Line a large baking sheet with parchment paper. Set aside.
Making the Cookies
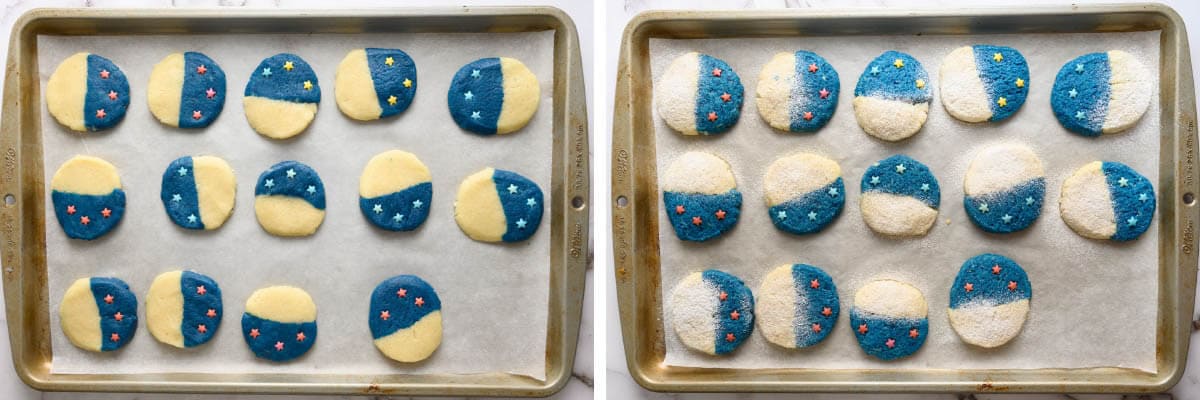
- Cut each log into ¼-in. slices, then press each cookie with your palm to flatten and place on the prepared baking sheet, 1-2 in. apart. Decorate with star sprinkles, about 3 stars per cookie.
- Bake in the preheated oven for 10-12 minutes, then remove from the oven and leave to cool on a baking sheet.
Making the Green Frosting*
- Melt the white chocolate in a heatproof bowl resting over a pan of simmering water. Once it is melted, stir in green food coloring and allow to cool for a few minutes (*or you can buy prepackaged tubes of green frosting if you prefer).
Decorating
- Using a cocktail stick/ toothpick, draw 3 trees with the green chocolate frosting on each cookie. Refrigerate for 2-3 minutes or until the chocolate is set. Dust with confectioner's sugar to emulate snow, if desired. Enjoy!
Notes
- The cookies will store for up to 5 days in an airtight container.
- For crisper cookies, turned off the oven, but leave the baking sheet in the oven and keep the oven door slightly opened. This will help to dehydrate the cookies further.


Did you make this recipe? Let me know!